

This tutorial will walk you through setting up Multi-Node and writing your first smart contract in Graphene blockchain. This is a straightforward, step by step tutorial on Graphene smart contracts that picks off from our previous tutorial on basics of Graphene.
Address generation
We’ll start off with address generation.
1. Open terminal. Enter the following:
programs/witness_node/witness_node --rpc-endpoint 127.0.0.1:8090 #Runs the node without any configuration
programs/cli_wallet/cli_wallet #Run cli_wallet with any configuration in new terminal, keep the node open
2. In cli_wallet terminal, enter the following:
set_password tadas
unlock tada
suggest_brain_key
- Run these command four or more times and save the json for the pub/priv key pairs.
Setting up private testnet nodes
We’ll now set up private testnet nodes.
1. Delete object_database, witness_node_data_dir, wallet.json directory and files from graphene folder.
2. Open a new terminal instance. Enter the following:
mkdir -p genesis
programs/witness_node/witness_node --create-genesis-json genesis/my-genesis.json
3. Open my-genesis.json and modify the contents as follows:
(github plugin – doc my-genesis.json)
- Our example will be using only three initial accounts, so delete the others.
- Change witness candidates to three witnesses.
- Assign different public addresses and block_signing to witness candidates that you generated in the steps above.
Let’s start setting up different nodes
1. Open a new instance of terminal. Enter the following:
mkdir data
cd data
2. Make three folders named blockprod-1/2/3 and put the following config.ini files inside all three of them (github plugin doc – config.ini)
3. Change the parameters of config.ini files as below
- Change the p2p-endpoint = <ip_address>:<free_port>
- Alter the genesis-json = genesis/my-genesis.json
- Change the private-key = [pub/priv generated], three similar arrays.
- Open
rpc -endpoint to any port.
4. Open a new instance of terminal. Enter the following:
programs/witness_node/witness_node --data-dir data/blockprod-1 (in one terminal)
5. Use the following set of commands in a new terminal to generate Witness account.
programs/cli_wallet/cli_wallet (in new terminal)
set_password tadas
unlock tadas
import_key "nathan" 5KQwrPbwdL6PhXujxW37FSSQZ1JiwsST4cqQzDeyXtP79zkvFD3
import_balance nathan [5KQwrPbwdL6PhXujxW37FSSQZ1JiwsST4cqQzDeyXtP79zkvFD3] true
upgrade_account nathan true
suggest_brain_key (save the json- mnemonic, wif-priv, pub in a .txt file).
create_account_with_brain_key "Here will be the brain key you just copied in above command" my-account nathan nathan true.
transfer nathan my-account 10000 CORE "have some CORE" true.
upgrade_account my-account true
create_witness my-account "http://witness.bar.com/" true
vote_for_witness my-account my-account true true
vote_for_witness nathan my-account true true
dump_private_keys
6. Now add the pub/priv key pair (calculated in above step) in data/my-blockprod2/config.ini inside private-key field and add witness-id = 1.6.4.
7. Run the second node in another terminal
programs/witness_node/witness_node --data-dir data/blockprod-2
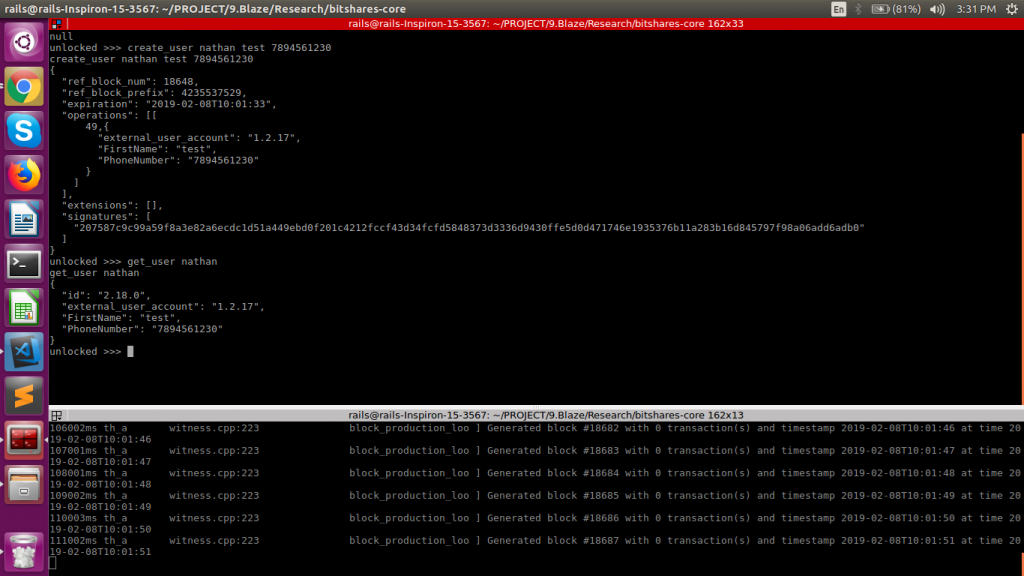
Finally, we’ll be writing our first smart contract on graphene blockchain.
This smart contract will simply store user data and fetch it in
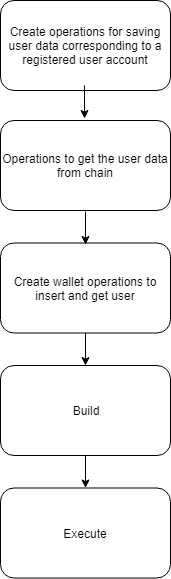
1.
2. Secondly, we will make
3. Thirdly, we will declare a method to insert data in
4. Define the methods do_evaluate and do_apply for inserting values of user in db in libraries/chain/user_evaluator.cpp
5. Following this, we will make a method for this operation to set its fees parameter and take arguments in libraries/chain/include/graphene/chain/protocol/user.hpp
6. Now, we have to add our operation name in operations file under libraries/chain/include/graphene/chain/protocol/operations.hpp
Add header file in operations.hpp
Then add the operation name under typedef fc::static_variant<
7. Add the user_object type in libraries/chain/include/graphene/chain/protocol/types.hpp
Make changes as listed below
- Include impl_user_object_type as the new value to the enum impl_object_type
- Declare the class class user_object
- Create a typedef
typedef object_id<implementation_ids, impl_user_object_type, user_object> user_id_type;
- Pass it to the FC_RELECT macro
FC_REFLECT_TYPENAME( graphene::chain::user_id_type )
8. We have to add the evaluator in libraries/chain/db_init.
9. Add the user protocol in libraries/chain/CMakeLists.txt
10. Now add a get method in database.hpp libraries/chain/include/graphene/chain/database.hpp
Add the header file for user_object and then add then declare the method for getting the user
#include <graphene/chain/user_object.hpp>
const user_object &get_user(account_id_type account) const;
11. Define method in db_getter.cpp in libraries/chain/db_getter.cpp
12. Now expose an
optional<user_object> get_user(account_id_type from) const;
And export the function inside FC_API(graphene::app::database_api, as
(get_user)
Finally, define the exposed function in database_api.
* inside database_api_impl
optional<user_object> get_user(account_id_type from) const;
Congratulations! You’ve reached the end of this tutorial and know how to write smart contracts on Graphene. Now you can revisit our previous tutorial on Graphene blockchain to brush up the concepts again, or have a look at other tutorials. For more information, and to get your business up on Graphene smart contracts, contact us.
Code reference: https://www.monetha.io
 Software?")


1 Comment
You know you’ve described how to add an operation to Graphene protocol? This is not a smart contract. This is just a change of blockchain protocol. The node with this change will not be able to sync with the network it belongs to.
Are you planning to make a hardfork every time you add a “smart contract”?